How To Grow Canna Lilies
By Marianne Willburn

Get ready to add dramatic, tropical flair to your garden with the lush foliage and unusual blooms of Canna Lilies! Growing Cannas in moist, rich soil, will give these tropical plants extraordinary growth during the dog days of summer and will give your beds, water features and containers an exotic, vertical boost!
Cannas come in a remarkable range of flower colors highly attractive to hummingbirds, and the large leaves range from green to deep black to orange-pink. You can enhance almost any traditional planting with Canna Lilies, and their love of moisture means they’re also a great choice for ponds and container water features. Most cultivars of Canna Lilies range from 5-6’, but there are many new 2-3’ cultivars just perfect for containers and smaller gardens.
Canna Lilies increase rapidly and are perennial in zones warmer than 7, but gardeners in cooler climates will find that the shallowly buried rhizomes dig and store easily in a garage or basement without extra coddling. From there, they’re ready to go back into the garden in spring – bigger and better than ever.
Growing Cannas: Planting Tips

When: Cannas are shipped in spring as dormant rhizomes (bulbs). As new foliage can be killed by a hard frost, wait until danger of frost is past. If you wish to get a jump on the season, you can start your Canna Lilies a little earlier in pots under a cold frame.
Where: Plant in rich soil in full sun. Cannas can handle partial shade but will grow leggy and flowering will be reduced. Cannas can also be used in the boggy margins of your water feature or container water feature. Make sure that the soil level is at or just above the level of the water for best results. If you are in a cooler climate, plant cannas in pots for easy extraction in the autumn.
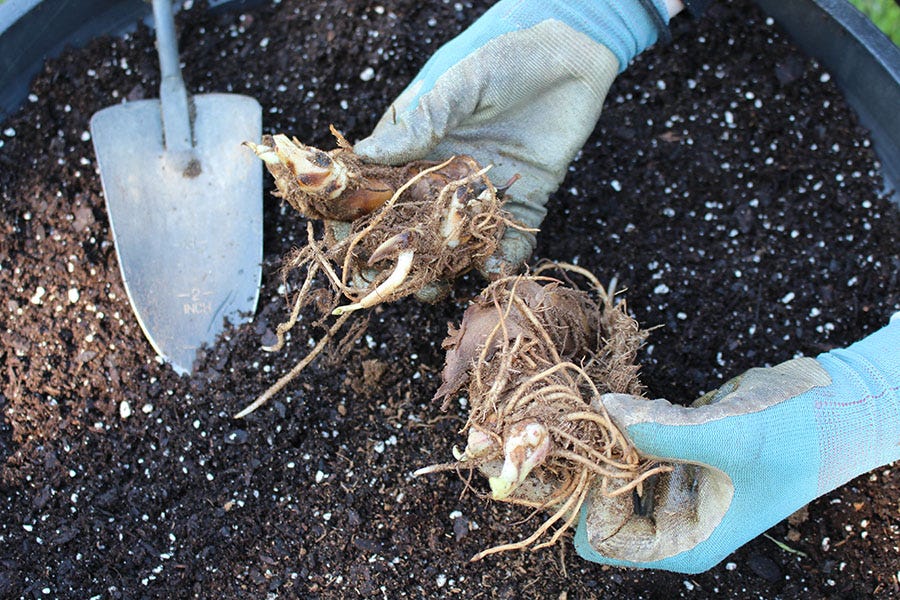
How: Plant the rhizomes horizontally 2-4 inches deep, with any visible buds facing upwards. Canna Lilies multiply quickly, and therefore spacing is usually recommended at 12-18”. However, if you want a fuller look and your soil is rich, spacing them 8-12” will not harm the plants.
Growing Cannas: Maintenance Tips
Cannas do not need staking, but if they are planted in a windy, exposed area, the leaves can be shredded. Providing shelter from wind is always a good idea.
Deadhead the large, unusual flowers by cutting low down on the stem. This prevents the plant from setting seed and encourages new stems to grow and bloom – which they will do right up to a hard freeze.
If leaves grow dull or ratty, simply cut the plant back by half, or even to the ground – Cannas will spring back with new foliage and flowers, growing rapidly in the summer heat. Just remember to water and feed them generously.
Growing Cannas with Companion Plants

If growing traditional tall varieties, make sure to place them in the back of the bed to enhance other plants. Those strong vertical lines pair well with panicle Hydrangeas and all types of ornamental grasses as well as a whole host of traditional perennial favorites.
Have fun with your pairings, remembering Canna Lilies are grown for both foliage and flower, so your companions need not bloom at the same time. Canna foliage will set off the likes of Bee Balm (Monarda), Yarrow (Achillea), and False Indigo (Baptisia), and then take over when these spring and early summer beauties are finished. When paired with Milkweed (Asclepias), gardeners get double the pollinators and double the hot-color punch!
Growing Cannas: Pest & Disease Issues
In some gardens, canna leaf rollers (two types of Lepidoptera species) can eat and disfigure the leaves, but they can be controlled through the regular application of the organic pesticide Bt (Bacillus thuringiensis).
Sometimes foliage is disfigured by rust. If this is a problem in your garden, cut back hard and apply fungicide at 10-day intervals. Selective pruning to increase ventilation and reduce crowding will also help but consider growing some of the newest cultivars which are bred specifically to be rust resistant. (High Country Garden’s Canna offerings are all disease resistant.)
Deer eat almost anything when they are hungry, but fortunately Canna Lilies are pretty low down on the list and are seldom severely damaged.
After Season Care of Cannas
Most Canna are hardy to Zone 8 and are marginal in Zone 7. Your garden’s microclimate can make a difference. Luckily, Cannas are easy to dig up and store during the winter, and because they increase so rapidly during the season, you can experiment by bringing some indoors and leaving some outside, well-mulched.
If digging, do so in late fall, when the foliage has begun to brown. Lightly brush away soil and cut back foliage to within 2” of the rhizomes. If congested, you can cut the rhizomes apart with a sharp, clean knife, removing any rotten areas.
Do not wash the bulbs, but let them dry out for a day or two in a sheltered spot, then store in plastic bags in a cool but frost-free, dark area. Leave the bags loosely closed for ventilation.
In spring, when soil temperatures have warmed, take out the rhizomes and plant just as you did the season before, discarding any that have rotted or dried out.
Let Cannas energize and enhance your garden this season with exotic foliage, unusual flowers and strong vertical lines. With unmatched versatility, Canna Lilies might just act as your secret weapon in the face of a hot, challenging summer!
Marianne Willburn is a garden columnist and the author of Big Dreams, Small Garden.
© All articles are copyrighted by High Country Gardens. Republishing an entire High Country Gardens blog post or article is prohibited without written permission. Please feel free to share a short excerpt with a link back to the article on social media websites, such as Facebook and Pinterest.